
Experimental machine learning algorithm validated with drone simulated data

So one of the main objectives of my PhD research was to achieve the difficult task of developing a learning algorithm for machine learning (RBF neural networks to be more specific) applications, that would enable the prediction of drone propeller damage in real-time AND without altering the bought-out flight controller (DJI Naza, APM, Pixhawk, etc...). The only way it could achieve that was by analyzing the outputs of the flight controller sensors and learn when a fault would occur.

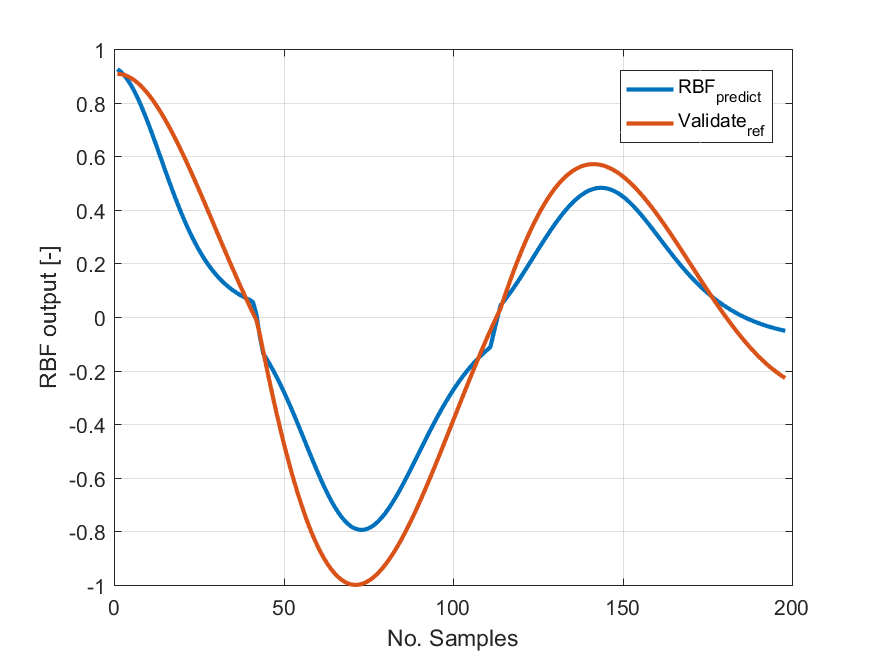
Well, I believe I'm getting closer to this objective (submission is Nov 2019). I've decided to include the two figures below which illustrates the training process (0.2 sec on desktop) and prediction time (0.008 sec) and the accuracy to the true dynamics of the quadcopter drone. In this case the pitch dynamics are being predicted. Although noise hasn't been introduced, it's quite clear from the graphs, that the learning algorithm has enabled the RBF network to accurately capture the dynamics of the quadcopter within a short time period.

This research milestone (quite a big one I might add) has now served as foundation to build a framework for developing more robust/complex machine learning algorithms with the aim of demonstrating the use of machine learning in a real-time/low-cost sense, which could be used to alert when a dynamic system (such as a drone) appears to have a fault.

Exciting times ahead...


Comments

Popular posts from this blog

Setting up the Tarot T4-3D gimbal on the Pixhawk 2.4.8 with Specktrum dx6 Gen2 toggle switch

So i took the challenge of setting up the Tarot gimbal not just for inherent stable video footage but also the flexibility of controlling it from the radio control. However, I encountered quite a few challenges which made me aware that I'm not the one only in this battle . It's quite clear that the setup of the Tarot gimbal using its own software is completely different from how it's been described in the Ardupilot/Arducopter webpage and in mission Planner. In Mission Planner and it's associated site makes one believe that it should be done through software, only to realize that in actual fact the setup is more complex than that.  After two evenings of trying various combinations, I realized the getting the pixhawk Aux channels to communicate with the T4 gimbal requires the following steps: - The Pixhawk Pin9 (Aux1) needed to be activated to pass through user-chosen channel from the transmitter. For the Dx6 Gen2 it was the channel 6, which can assigned the ...

Setup ArduPilot flight modes with DX6 Gen 2

Hi, I've looked around the web to get an understanding the setup of the Ardupilot flight modes with a Spektrum DX6 2nd generation and there was none. So I decided to write this blog. The few things to consider when doing this: Please follow the instruction given on the ardupilot webpage . Have the Pixhawk hardware connected to Mission Planner (I have 1.3.50 - Copter V3.5.3)  Use the display bar in the Radio Calibration page as a guide while changing the rate pulse widths on your transmitter. I've used switch D to change the pulse width ranges on channel 5.

GPS Navigation Ground Test #1 - Waypoint Tracking Algorithm

So after a period of absence of over a month (feel depressed everytime I say it), I got back into the groove of things. Decided not to wait to get back on the field to test the pitch and roll autopilot and decided to start working on the waypoint tracking algorithm . The advantage of having your own home with a garden is that you no longer struggle to get a GPS lock (There's no more concrete flats surrounding us yeah!!!). So got familiar with my gear again. Also decided to buy a piezo buzzer that could be used as a replacement of the serial monitor. The aim was to increase the intensity of sound as you got closer to the next waypoint. In such a way you will know if you're going the correct way. Decided to use GPS Visualizer to get waypoints on the property. Re-formatted the points into the code uploaded it onto the controller. It must add that I managed to successfully run arduino from the linux command line and use the program screen as a serial monitor. Not only is it m...